SQL Formatter Options
Options
Merge
The MERGE Options in the SQL Formatter Tool allow you to configure the formatting of MERGE INTO statements in SQL. These settings enable you to structure the syntax for better readability, consistency, and maintainability.
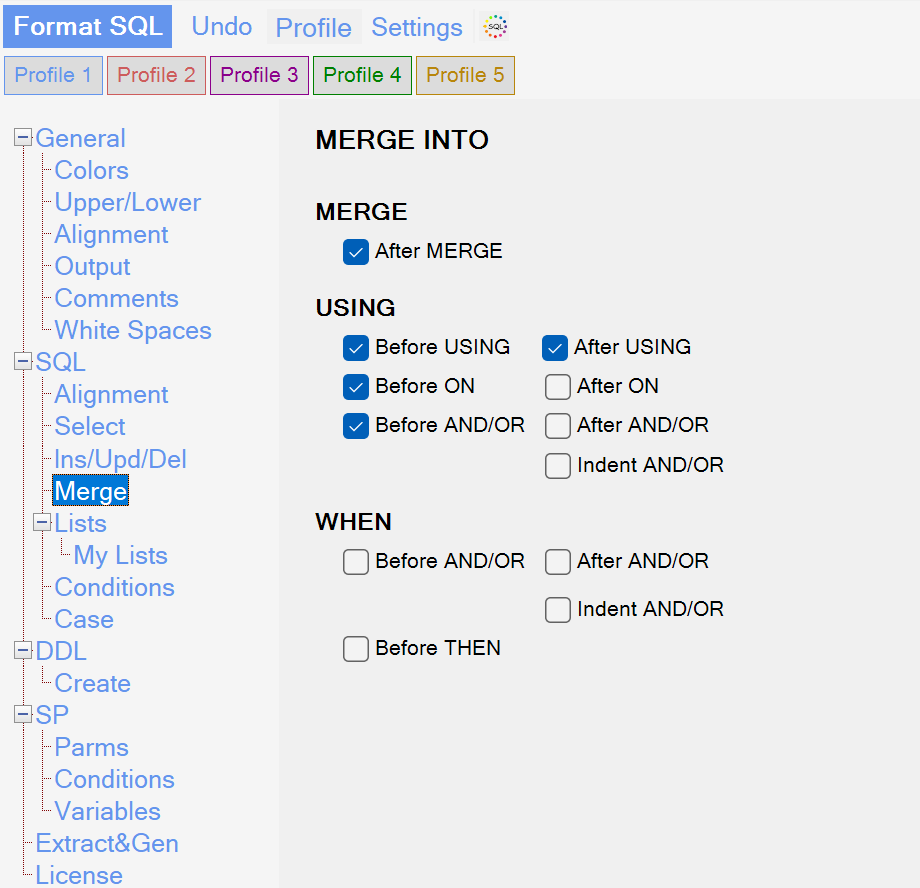
MERGE
- After MERGE
- Adds a line break immediately after the
MERGEkeyword. - This ensures a clear separation between the
MERGEkeyword and the subsequent clauses.
- Adds a line break immediately after the
USING
Before USING / After USING
- Before USING: Adds a line break before the
USINGkeyword. - After USING: Adds a line break after the
USINGkeyword. - These options improve the structure of the
MERGE INTOstatement by visually separating theUSINGclause.
- Before USING: Adds a line break before the
Before ON / After ON
- Before ON: Adds a line break before the
ONclause, which defines the merge condition. - After ON: Adds a line break after the
ONclause for better clarity.
- Before ON: Adds a line break before the
Before AND/OR / After AND/OR
- Before AND/OR: Adds a line break before logical operators like
ANDorORin theUSINGclause. - After AND/OR: Adds a line break after these operators for better readability.
- Before AND/OR: Adds a line break before logical operators like
Indent AND/OR
- Indents logical operators (
AND/OR) to align them with the structure of theUSINGclause.
- Indents logical operators (
WHEN
Before AND/OR / After AND/OR
- Before AND/OR: Adds a line break before logical operators (
AND/OR) in theWHENclause. - After AND/OR: Adds a line break after these operators for improved visibility.
- Before AND/OR: Adds a line break before logical operators (
Indent AND/OR
- Indents logical operators (
AND/OR) in theWHENclause to align them with the clause’s indentation.
- Indents logical operators (
Before THEN
- Adds a line break before the
THENkeyword in theWHENclause for better readability of actions.
- Adds a line break before the
Conditions
The Conditions Options in the SQL Formatter Tool allow you to configure how conditions in SQL statements are formatted. These settings control the placement of line breaks, indentation, and logical operator alignment, improving the readability and structure of SQL queries.
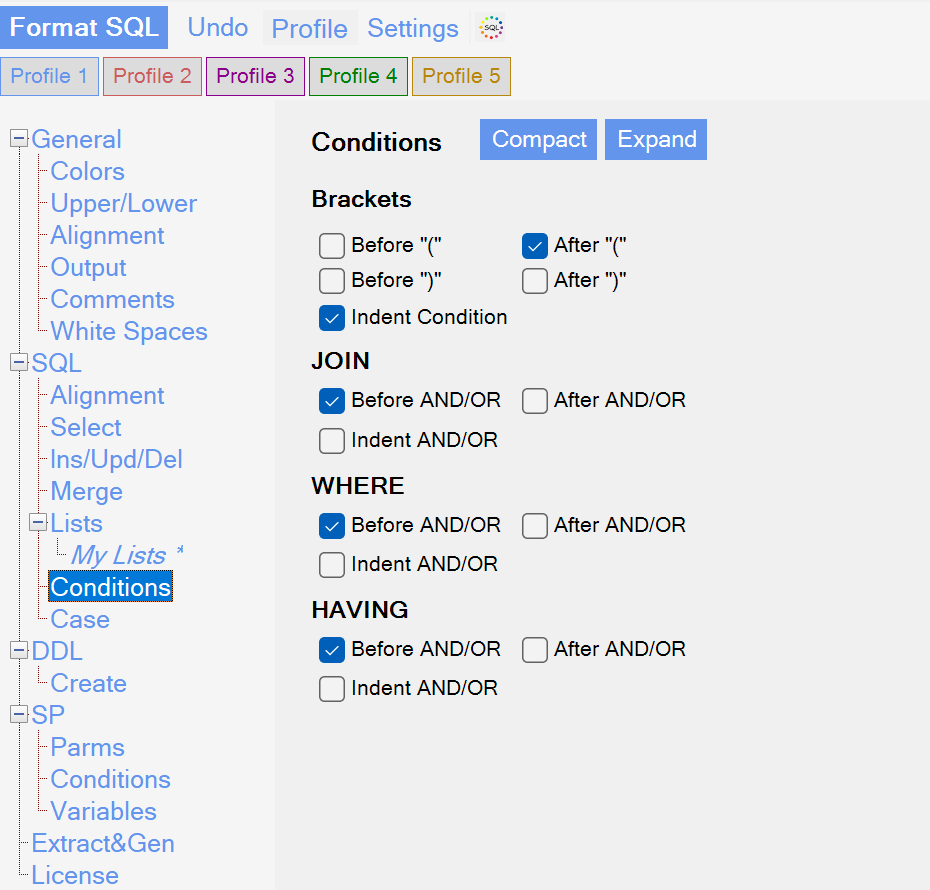
Brackets
Before „(“ / After „(„
- Before „(„: Adds a line break before the opening parenthesis in conditions.
- After „(„: Adds a line break after the opening parenthesis.
Before „)“ / After „)“
- Before „)“: Adds a line break before the closing parenthesis in conditions.
- After „)“: Adds a line break after the closing parenthesis.
Indent Condition
- Indents the conditions within brackets for better alignment and readability.
JOIN
Before AND/OR / After AND/OR
- Before AND/OR: Adds a line break before logical operators like
ANDorORinJOINconditions. - After AND/OR: Adds a line break after these logical operators.
- Before AND/OR: Adds a line break before logical operators like
Indent AND/OR
- Indents logical operators (
AND/OR) inJOINconditions to align them with the structure of the query.
- Indents logical operators (
WHERE
Before AND/OR / After AND/OR
- Before AND/OR: Adds a line break before logical operators in the
WHEREclause. - After AND/OR: Adds a line break after these operators for better clarity.
- Before AND/OR: Adds a line break before logical operators in the
Indent AND/OR
- Indents logical operators (
AND/OR) in theWHEREclause for improved visual hierarchy.
- Indents logical operators (
CASE
The CASE Options in the SQL Formatter Tool allow you to format CASE statements with precision, ensuring better readability and alignment with coding standards. These settings control indentation, line breaks, and compactness for both simple and complex CASE structures.
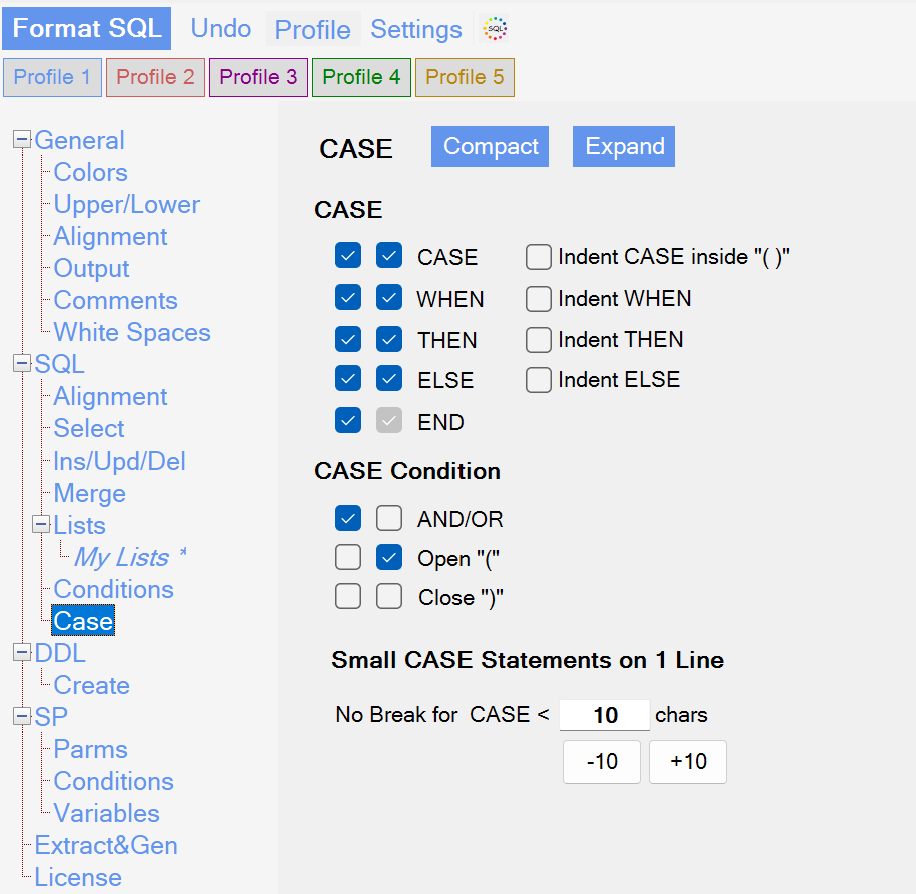
CASE Formatting
CASE, WHEN, THEN, ELSE, END
- Adds line breaks before these keywords in the
CASEstatement for better clarity and structure. - These options ensure each component of the
CASEblock is properly separated.
- Adds line breaks before these keywords in the
Indent CASE inside „()“
- Indents the entire
CASEblock when it is enclosed within parentheses.
- Indents the entire
Indent WHEN, THEN, ELSE
- Adds indentation to the
WHEN,THEN, andELSEkeywords for hierarchical alignment in nested or multi-lineCASEstatements.
- Adds indentation to the
CASE Condition
AND/OR
- Adds a line break before logical operators (
AND,OR) within theCASEconditions to clearly separate them from other conditions.
- Adds a line break before logical operators (
Open „(“ / Close „)“
- Open „(„: Adds a line break before the opening parenthesis in
CASEconditions. - Close „)“: Adds a line break after the closing parenthesis for better visibility of nested conditions.
- Open „(„: Adds a line break before the opening parenthesis in
Small CASE Statements on 1 Line
- No Break for CASE < X chars
- Keeps small
CASEstatements (e.g., under 10 characters) on a single line for compactness. - Adjust the character limit using the
-10and+10buttons to define what qualifies as a „small“CASEstatement.
- Keeps small
Compact vs. Expand
- Compact: Condenses
CASEstatements by reducing line breaks and indentation. - Expand: Formats
CASEstatements with more line breaks and indentation for improved readability.
How to Use These Settings
Enable or Disable Line Breaks
- Use the checkboxes for CASE, WHEN, THEN, ELSE, END to specify where line breaks should be added in
CASEblocks.
- Use the checkboxes for CASE, WHEN, THEN, ELSE, END to specify where line breaks should be added in
Customize Indentation
- Enable indentation options like Indent CASE inside „()“ and Indent WHEN, THEN, ELSE to align keywords hierarchically within the
CASEblock.
- Enable indentation options like Indent CASE inside „()“ and Indent WHEN, THEN, ELSE to align keywords hierarchically within the
Adjust Logical Conditions
- Use the AND/OR option to structure complex conditions within
CASEstatements with line breaks and proper alignment.
- Use the AND/OR option to structure complex conditions within
Set Character Limits for Compactness
- Define a character limit for keeping small
CASEstatements on one line to maintain a balance between compactness and readability.
- Define a character limit for keeping small
Switch Between Compact and Expand Modes
- Use Compact for minimizing line breaks in short
CASEblocks and Expand for a detailed, well-structured format.
- Use Compact for minimizing line breaks in short
DDL Create
The Create Table / Create Index Options in the SQL Formatter Tool allow you to format SQL CREATE statements with better structure and readability. These settings control line breaks, indentation, and keyword alignment for table and index creation queries.

Linebreaks
Before „(“ / After „(„
- Before „(„: Adds a line break before the opening parenthesis in
CREATEstatements. - After „(„: Adds a line break after the opening parenthesis.
- Before „(„: Adds a line break before the opening parenthesis in
Before „)“ / After „)“
- Before „)“: Adds a line break before the closing parenthesis in
CREATEstatements. - After „)“: Adds a line break after the closing parenthesis.
- Before „)“: Adds a line break before the closing parenthesis in
Indentation
Indent Cols in Brackets
- Indents the column definitions inside parentheses for better alignment and readability in
CREATE TABLEstatements.
- Indents the column definitions inside parentheses for better alignment and readability in
Indent Bracket
- Adds indentation to the opening and closing parentheses, ensuring they align correctly with the rest of the SQL structure.
My CREATE Keywords Getting Linebreaks
- This section allows you to define specific
CREATEkeywords that should automatically receive line breaks in the formatted output.
Stored Procedures / Parms
The Procedure/Function Parameters Options in the SQL Formatter Tool allow you to configure the formatting of parameters in stored procedures or functions. These settings provide control over line breaks, indentation, and alignment for better readability and organization.
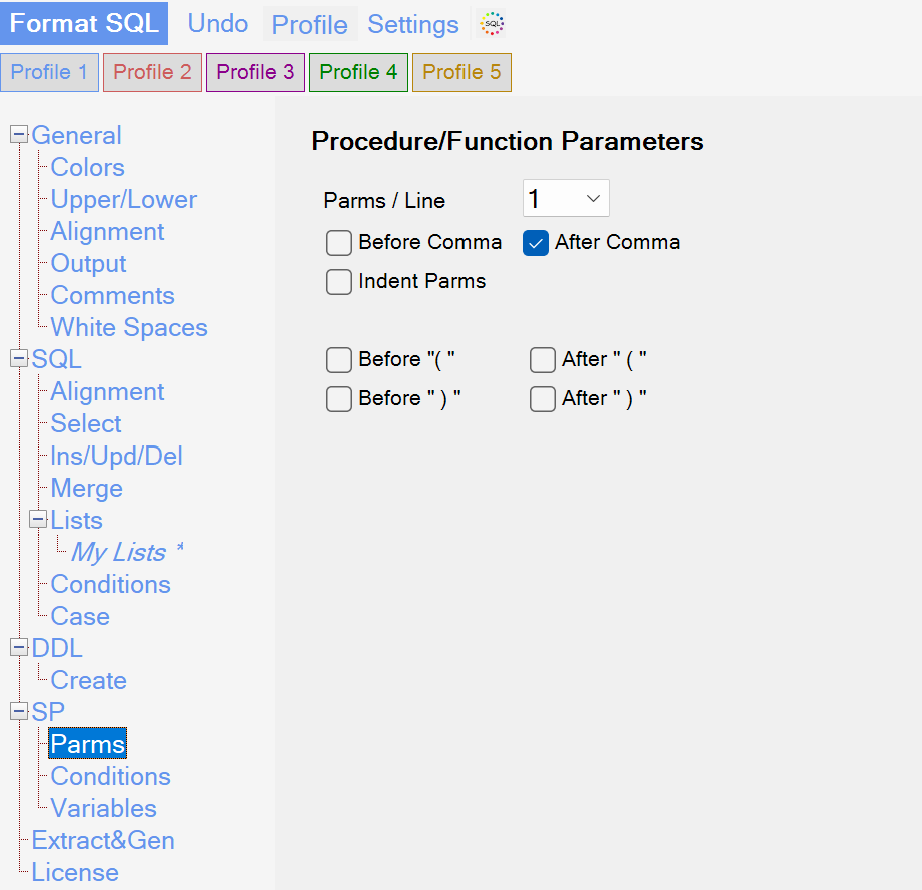
Parms / Line
Parms / Line
- Specifies how many parameters are displayed on each line.
- Example: Setting this to
1ensures each parameter is placed on a new line, while larger values allow multiple parameters per line.
Before Comma / After Comma
- Before Comma: Adds a line break before commas separating parameters.
- After Comma: Adds a line break after commas separating parameters.
Indent Parms
- Indents all parameters to align them visually within the parameter list.
Parentheses
Before „(“ / After „(„
- Before „(„: Adds a line break before the opening parenthesis in the parameter list.
- After „(„: Adds a line break after the opening parenthesis.
Before „)“ / After „)“
- Before „)“: Adds a line break before the closing parenthesis in the parameter list.
- After „)“: Adds a line break after the closing parenthesis.
How to Use These Settings
Set Parameters Per Line
- Adjust the Parms / Line dropdown to control the number of parameters per line, ensuring better readability for procedures or functions with long parameter lists.
Control Comma Placement
- Enable Before Comma or After Comma to manage line breaks around commas for separating parameters.
Enable Indentation
- Use Indent Parms to align all parameters neatly, making the code easier to scan and understand.
Customize Parenthesis Placement
- Use the checkboxes for Before „(„, After „(„, Before „)“, and After „)“ to add line breaks around parentheses and create a clear structure.
Tips for Optimal Usage
- Set Parms / Line to
1for procedures or functions with many parameters to ensure each parameter is displayed on its own line. - Use After Comma for better separation and readability when listing multiple parameters.
- Enable Indent Parms to create a visually aligned and clean parameter list.
- Add line breaks around parentheses for complex parameter lists to enhance clarity.
By configuring these options, you can ensure that procedure and function parameter lists are consistently formatted, making them easier to read and maintain. For additional assistance, refer to the user manual or contact support.
Stored Procedures / Conditions
The IF and Conditions Options in the SQL Formatter Tool allow you to customize the formatting of conditional statements (IF, THEN, ELSE) and related constructs. These settings ensure that conditions are formatted clearly and consistently, enhancing readability and maintainability.

IF and THEN/ELSE Formatting
IF
- Adds a line break before or after the
IFkeyword to structure conditional statements.
- Adds a line break before or after the
THEN
- Adds a line break before or after the
THENkeyword for better separation. - Indent THEN: Indents the
THENblock to align it hierarchically with theIFstatement.
- Adds a line break before or after the
After ELSE
- Adds a line break after the
ELSEkeyword to clearly separate it from subsequent content. - Indent ELSE: Indents the
ELSEblock for better visual structure.
- Adds a line break after the
Conditions
Open „(“ / Close „)“
- Open „(„: Adds a line break before the opening parenthesis in conditions.
- Close „)“: Adds a line break after the closing parenthesis for improved readability.
AND/OR
- Adds a line break before logical operators (
AND/OR) in conditional statements for clarity.
- Adds a line break before logical operators (
Indent Conditions in Brackets
- Indents conditions enclosed within parentheses to align them with the surrounding structure.
Align Compare Operators (<, >, =, …)
- Aligns comparison operators (e.g.,
<,>,=) to create a clean and visually consistent layout.
- Aligns comparison operators (e.g.,
BEGIN/END
- Indent BEGIN … END
- Indents the
BEGINandENDblocks to reflect the nested structure of procedural SQL. - This ensures that all statements within the block are visually grouped.
- Indents the
How to Use These Settings
Enable Line Breaks for Keywords
- Use the checkboxes for IF, THEN, and ELSE to define where line breaks are added around these keywords.
Customize Indentation
- Enable Indent THEN and Indent ELSE to structure the blocks for hierarchical alignment.
- Use Indent Conditions in Brackets to format conditions neatly within parentheses.
Control Parenthesis and Logical Operators
- Use Open „(„ and Close „)“ to separate parenthesis-enclosed conditions.
- Add line breaks with AND/OR to clearly distinguish logical conditions.
Align Operators
- Enable Align Compare Operators (<, >, =, …) to create visually consistent conditional statements.
Indent BEGIN/END Blocks
- Use the Indent BEGIN … END option to ensure procedural blocks are aligned and easy to follow.
Tips for Optimal Usage
- Use Indent THEN and Indent ELSE for a clear hierarchical structure in conditional statements.
- Enable Align Compare Operators to ensure conditions are easy to read, especially in complex queries.
- Add line breaks with AND/OR to separate logical operators and improve readability.
- Indent BEGIN … END blocks to reflect their nested nature and maintain clarity in procedural SQL.
Stored Procedures / Variables
The Variables Options in the SQL Formatter Tool allow you to format and align variable declarations and assignments consistently in stored procedures and functions. These settings help ensure clarity and organization in variable-related SQL code.

Available Options
Align Variable Declaration
- Ensures that all variable declarations (
DECLARE) are aligned vertically in the SQL script. - This makes it easier to scan and understand declared variables, especially in complex stored procedures.
- Ensures that all variable declarations (
Align Variable Association Operator (
=>)- Aligns the association operator (
=>) used in constructs like parameter passing or key-value pairs in certain SQL contexts. - Ensures consistent alignment when multiple association operators are used.
- Aligns the association operator (
Align Assignment Operator (
:=,=,*=,.=, etc.)- Aligns assignment operators used for assigning values to variables.
- This includes different operators like
:=(PL/SQL),=(T-SQL or standard SQL), and others. - Helps create a clean and visually structured code layout for assignments.
Extract from Source Code / Generate Source Code
The Extract & Generate Options in the SQL Formatter Tool provide functionality to extract SQL statements from source code (e.g., Java, C#) and generate source code in various programming languages based on formatted SQL. These features are essential for integrating SQL with application code efficiently.
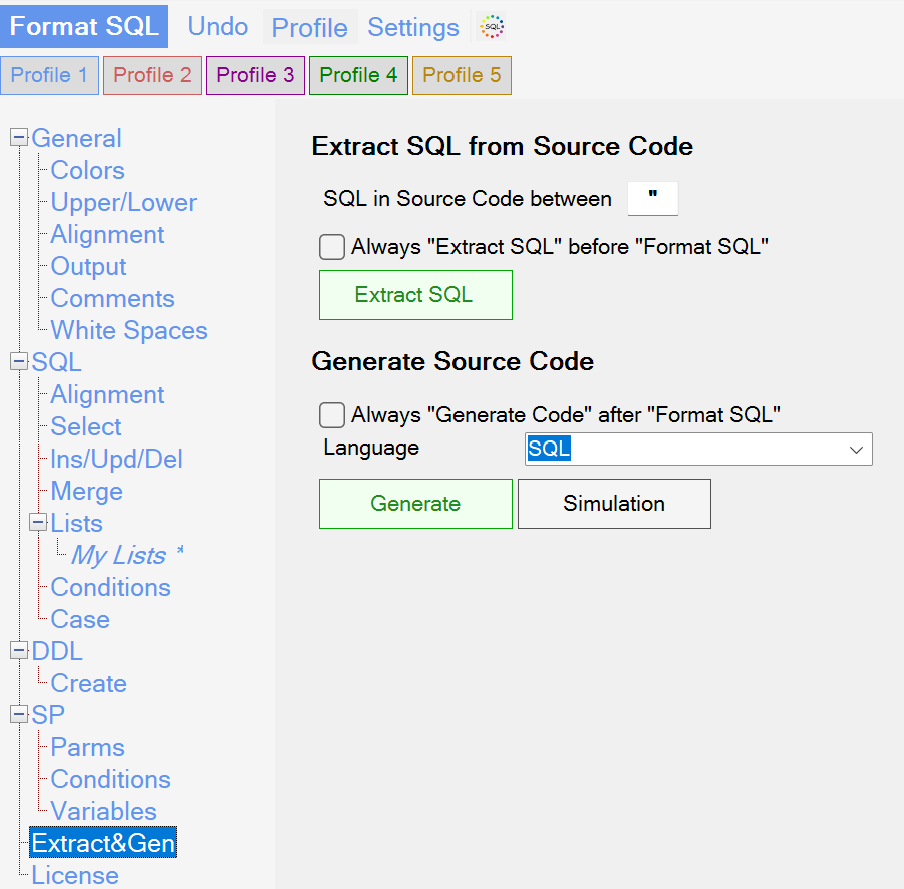
Extract SQL from Source Code
SQL in Source Code Between
- Defines the delimiters or markers that indicate the start and end of SQL code within the source code.
- Example: SQL statements in Java might be enclosed in double quotes (
"SELECT * FROM table;").
Always „Extract SQL“ Before „Format SQL“
- When enabled, the tool will automatically extract SQL from the source code before applying any formatting.
- This ensures that only valid SQL statements are formatted.
Extract SQL
- Click this button to extract SQL code from the source code based on the specified delimiters.
- The extracted SQL can then be formatted using the tool.
Generate Source Code
Always „Generate Code“ After „Format SQL“
- When enabled, the tool automatically generates source code after formatting the SQL.
- This ensures that the formatted SQL is seamlessly reintegrated into the source code.
Language
- Select the target programming language for generating source code (e.g., Java, C#, etc.).
- This setting adapts the generated code to match the syntax and conventions of the chosen language.
Generate
- Click this button to generate source code based on the formatted SQL and the selected programming language.
- The tool ensures proper escaping and syntax adjustments for the target language.
Simulation
- Allows you to simulate the source code generation process without making any actual changes.
- Useful for previewing the generated output before applying it to your project.
How to Use These Features
Extracting SQL
- Specify the delimiters used in your source code to enclose SQL statements in the SQL in Source Code Between field.
- Click Extract SQL to pull out the SQL statements, which can then be formatted.
Formatting SQL
- Use the standard formatting options in the tool to format the extracted SQL statements.
- Ensure Always „Extract SQL“ Before „Format SQL“ is enabled for automatic extraction during formatting.
Generating Source Code
- Select the desired target language in the Language dropdown.
- Click Generate to create source code with the formatted SQL embedded, using the syntax and conventions of the chosen language.
- Use the Simulation button to preview the generated source code before applying it.
Automating the Workflow
- Enable Always „Generate Code“ After „Format SQL“ to streamline the process of formatting SQL and generating source code in one step.
Tips for Optimal Usage
- Delimiters: Ensure the correct delimiters are set in the SQL in Source Code Between field to accurately extract SQL from your source code.
- Language Selection: Choose the appropriate language in the Language dropdown to ensure compatibility with your application code.
- Simulation: Use the Simulation option to verify the generated code before applying it, avoiding potential integration issues.
- Automation: Enable the Always „Extract SQL“ Before „Format SQL“ and Always „Generate Code“ After „Format SQL“ options to automate and speed up repetitive tasks.